 Beautiful pictures fascinate people, on prints, and online. If you are a photographer – doesn’t matter professional or amateur – and haven’t got yourself a website, it’s high time you should.
In this week’s article, I’ll walk you through how to make your photography website in 6 simple steps.
6 Steps to Make Your Own Photography Website
Step #1 – Select a Domain Name
Before we get to the main part of the website, we need to give it a name. In the internet world, this is called a domain name. A custom domain is a website name that you pay for versus a subdomain which is free. If you want something that reflects your brand, I would recommend that you go with a custom domain. If you are just building a portfolio, you can always start with a sub-domain and upgrade later on.
There are plenty of ways to come up with a domain name. You can choose something artsy, professional or even use your own name, which is quite a common trait among fellow photographers.
Step #2 – Select a Publishing Platform
 The next step is to select the type of platform to build your website. You can use simple website builders or content management software. Website builders are easy for beginners, but they usually have restrictions such as limited pages or limited image storage which is not ideal for a photography site.
On the other hand, content management software has more flexibility, allows more customization and most importantly, it makes your website more visible online (we will talk more about this later). Hence, I would recommend that you use WordPress because it offers more advantages than the typical website builders.
Step #3 – Select a Hosting Plan
A host is a company that stores your website content, provide backups and allow you to access the servers to modify certain files. Hosting fee is how much you pay to the company for these services and the pricing plan often differs according to the type of technologies that powered these hosting. You will probably see a variety of free plans (which usually come with a subdomain), insanely cheap ones as well as higher priced hosting packages.
So which one should you go for?
 In order to run a smooth photography website, you should have a fast loading server. Online images can take up a lot of bandwidth so a slow page load isn’t going to provide your viewers with good user experience. So choose a plan that’s within your budget, offers reliable hosting services and has a lot of positive customer reviews.
Up until this point, it may appear that you need to go to three different places to have all the things set up. Well, technically you do, but with SiteRubix, you can actually complete all three steps, at a very affordable fee, in one single platform.
Step #4 – Choose a WordPress Theme
Here is where the fun part begins – deciding how your website would look like. WordPress is renown for a variety of themes and when it comes to the photography niche, there are plenty of choices to choose from.
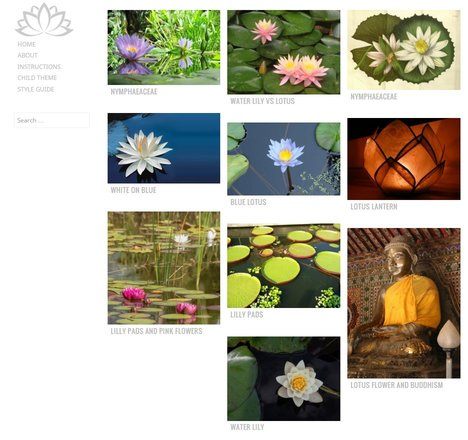
Do you like to showcase your pictures in large images with a minimal sidebar? Go for Water Lily.
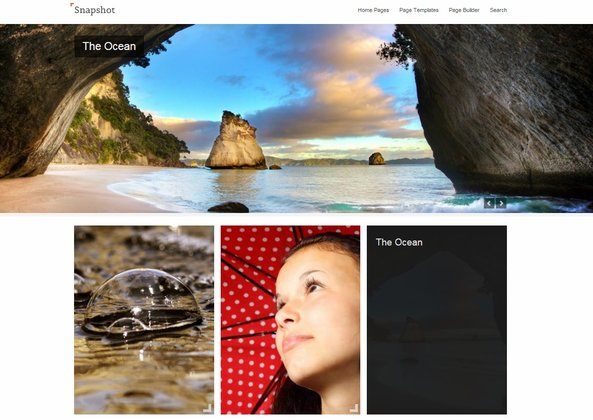
Do you want to create a photoblog with a stunning slider? Try SnapShot theme.
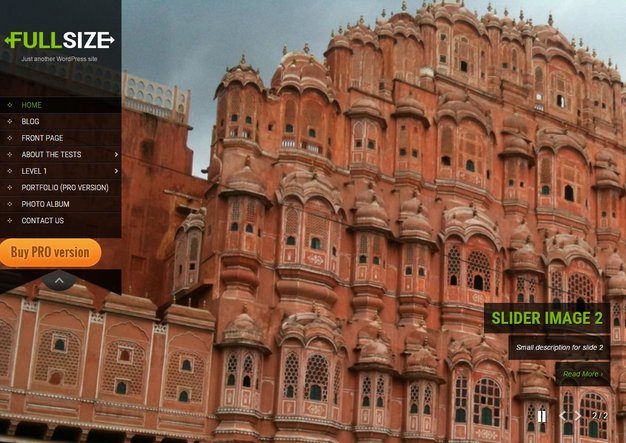
Or do you want to blast your pictures large and wide? Then you should check out the SKT Full Width theme.
Most WordPress themes are professional looking and responsive, which means the website layout will change to suit the device that the readers are using. After installing, you should always check using your smartphone or tablet; if it doesn’t work correctly, change to another theme no matter how much you like it. A theme that isn’t responsive will drive your mobile readers away and that’s not what you want.
Even with free themes, you can be spoiled with a lot of choices. If your budget is willing, you can always use premium themes to create a more fantastic looking website.
Step #5 – Create The Main Pages (Your Selling Points)
To create a professional outlook, you need to tell the world a little about yourself. In the WordPress user dashboard, you’ll see “Page” on the left hand side column. Create some pages for the following.
- An introduction about yourself.
- What your website is all about.
- Showcase some pictures about your work.
- Include positive comments/ feedback from people who have hired or worked with you.
- Let viewers know how they can contact you.
Give some thoughts when you are writing content for these pages because they can affect the reader’s impression about your work in general.
Step #6 – Introduce Your Site to Google
 Next on the checklist is to submit your site to Google Webmaster and create a Google Analytics account. This will prompt the search engine to start indexing your web content and track your online traffic.
Most WordPress websites are designed to optimize for search engines, so as long as you are producing good quality content, most people will find your site online easily.
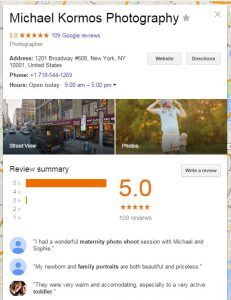
If you are running a local photography site, you can also list your business online with Google for free. This will enable local customers to find you better and help get more positive reviews for your photography site.
Exciting Journey Ahead…
 Now that you have created a photography website, the next thing is to plan how to monetize from it. There are a variety of ways to do this.
- Create online photography courses for beginners.
- Sell some eBooks.
- Sell photos online.
- Promote workshops for aspiring students.
- Collaborate with other photographers to work on creative projects.
- Be an affiliate and write reviews for camera gadgets and related tools.
By learning to diversify your source of income, you are no longer that photographer who takes another picture. You are an online entrepreneur in the making. How exciting is that? 🙂
If you want to learn more about growing a successful photography business, check out the Online Entrepreneurship Certification at Wealthy Affiliate for tools and support to help you get started.
Do you have any thoughts or questions about creating a photography website? Please leave your comment below and I’ll get back to you.

Hi Cathy,
I was looking for ways to start my own online business and I stumbled across this post. And you have given me the idea to start my own photography business. You’ve done a great job in breaking down the entire process into simple steps which makes it very easy for anyone to understand.
You mentioned something about Wealthy Affiliate University. Is it free to join?
Hi Kumar,
Wealthy Affiliate is free to join. There are two types of membership – Starter and Premium. As a Starter, you get access to the Premium features during the first week of your enrollment. This will give you a good feel of what the online training is all about before you decide on an upgrade. Otherwise, you can always stay as a Starter member for as long as you like and won’t be asked for your credit card.
The Premium offers a whole lot more features and training that can bring your online business to greater heights. For more information on this, please read my personal review on Wealthy Affiliate here.
Hi Cathy,
What a fantastic article! You have included everything I could possibly need in order to start my photography websites. Including more ways to make money other than just taking pictures. I really like the fact that you even included some themes to use. I especially like the SnapShot one.
Hi Vivia. Glad you benefited from this article.
Hi Cathy,
You make it all sound so easy! You’ve thoroughly explained each step of the way. One way of getting people to use your site is to offer a section of free photos to build site trust and then that might tempt some web site owners to go on and buy some photos also.
Thank you for that great idea, Sammi.
By offering free photos for download, you are actually giving readers an opportunity to access your work easily and make your business more approachable. That’s a good way to build your online brand as a start-up.
Hello Cathy,
Excellent article, as I am a photographer and just created a photography website one month ago I found these steps very useful to me and I took notes for some ideas, I already added some photography courses and start posting some tutorial for different photography techniques, great article Thanks!.
Hi there Ehab,
I have visited your website and I think it’s an awesome site. You clearly know your stuff and the content is professionally written with a lot of great product reviews. Creating an online course is a good strategy to get more subscribers and followers. Good job!
Cathy,
I just visited your website and this article caught my attention. Very nice step by step instructions on building a site not only for photography but for anyone who has a passion and wants to market their idea. I have an idea and I am going to try out your suggestions and follow the steps you outlined and see where it takes me. I will be back to let you know how I am progressing.
Thanks for the information.
Hi Robert,
You are absolutely right. With a little bit of ‘thinking outside of the box’, these 6 steps can be applied to any sort of business website. WordPress theme designers are very smart these days coming up with templates that go very well with a specific niche.
What I would suggest is that you go to Google search, type in “niche” + WordPress theme to read some reviews from other people who have experiment with them before. It will give you a better idea on what to expect on your screen later on.
HI Cathy,
You did such an excellent job in introducing the possibility of people who have photography as a hobby, (whether as you said it being professionally or as an amateur) to build for themselves a potentially money-making website.
Now I previously have seen websites done here by WA which teach people how to build a website generically. I even did an article myself in this very same manner.
However Cathy, you get an A++ for the creative way in which you did it, using the concept of building such a website dedicated to photography. I gather that this is a hobby of yours – photography?
You clearly explain in an easy-to-understand fashion the 6 steps needed to build a photography website from the ground up. Towards the end of your great article you then explain to readers how with this newly created website which deals with photography how they then have many possibilities in order to turn it into a profitable online business. Kudos on your part for introducing to your readers this very important concept!
Thanks for your kind comment, Jeff.
Photography is indeed a passion of mine. It’s one of the things that I would like to do full time once I get out from the 9-5 rat race. There are a lot of people searching to take pictures in all sorts of occasions, yet many photographers are not building a real online presence such as building a website or engaging in social media.
These 6 steps are easy to follow without having to pay a hefty fee for a web professional service. Hence I would strongly encourage any photographers to go out there and start growing their online business locally or even globally.