
E-retail isn’t only growing in popularity worldwide but also becoming a necessity for modern business marketing. Whether it’s selling products or services, everyone can benefit from learning how to create an online store with WordPress. Today, I’ll be using the WooCommerce solution as an example and walk you through the details that will make your shop show up on Google.
Why Use WooCommerce on WordPress
Over the years, WordPress has become more than just a blogging platform. Its diversity has extended to accommodate for eCommerce features and WooCommerce is one of the leading solution out there.
- WordPress back office settings complement search engine marketing.
- WooCommerce offers free themes/plugins and a ton of technical support.
- That means, all you have to invest is on a good quality WordPress hosting and you are good to go.
By combining the two, you are going to be building a long term traffic source (80% of users derive from the search engines) to your business and it doesn’t even have to cost a bomb. Hence, the focus of this article moving forward is to target this free traffic and reveal the important settings that can help to RANK PAGES that matter for your sales conversion.
It’s not about the design elements, but more towards the technical side of things. Yes, the details might be a bit complicated, but they are absolutely crucial to know, regardless of the type of publishing platform you use. So, are you ready? Let’s jump right in.
What You Need for The Initial Set-Up
1) First thing first, you need to purchase a business domain name, preferably one that matches your current business brand and one that ends with a .com extension.
2) Next, subscribe to a hosting plan that uses WordPress. Since you’ll be receiving payments from customers online, keep in mind that the plan should also come with an SSL certificate for securing an online transaction.
3) Do you have the soft copy of your business logo? Prepare one with the dimension of 470 X 110 pixels as you’ll be needing it later.
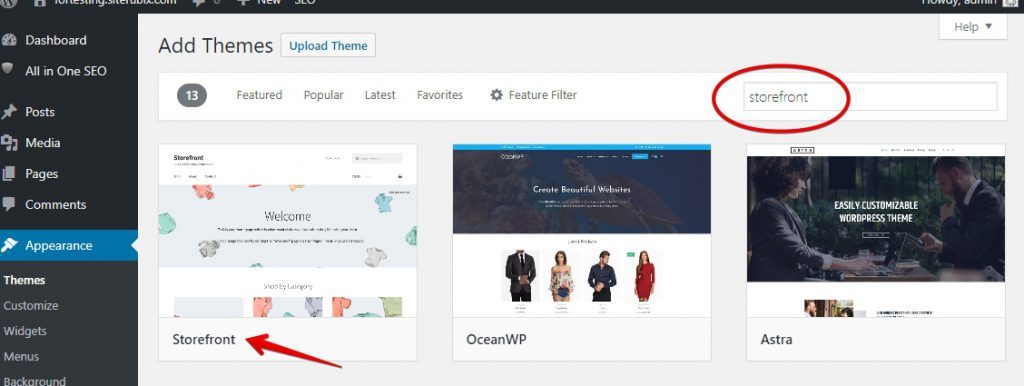
4) Once you get access to the back office of the WordPress website, go to Appearance ⇒ Theme, search for Storefront and activate the theme.
5) Next, install the following plugins and I’ll show you what they are used for, shortly.
- All in One SEO (AIO SEO)
- EWWW Image Optimizer
- WooCommerce
- Contact form 7
- Super Socializer
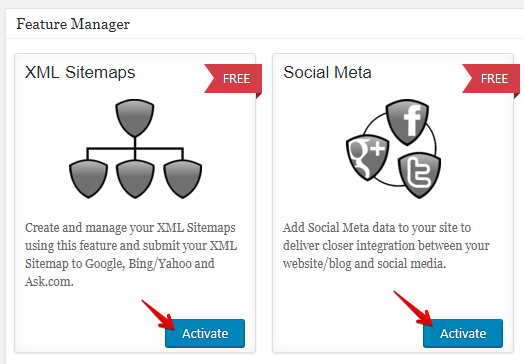
A note on AIOSEO plugin – Go to Feature Manager and activate XML Sitemaps and Social Meta. You’ll need these two features to be turned on for the search engines to detect new pages on your site and to optimize for social sharing.
6) Some pages/posts/comments are created by default when you install a WordPress theme. I would suggest that you delete them to avoid any confusions during the editing process.
E-Commerce Keyword Research – Why Are They Important
Before we go into the configuration details, I want to take a moment to highlight the importance of understanding keyword research for an online store. The main reason a business is able to sell something online is because they know what their prospective customers are searching for.
For every niche, there’s a keyword/keyphrases that people use to search for related products and services. So if yours is a clothing boutique, keywords like T-shirts, pants or skirts will make sense. But nowadays, people don’t just go online to buy a skirt. Given the varieties, people will search for specific clothing that match their needs and requirements.
That means, finding out what are the specific terms that are used to search for those specific items are extremely crucial for an eCommerce business to capture the right audience for their products. In the internet marketing world, they are called long-tail keywords – descriptive and highly profitable.
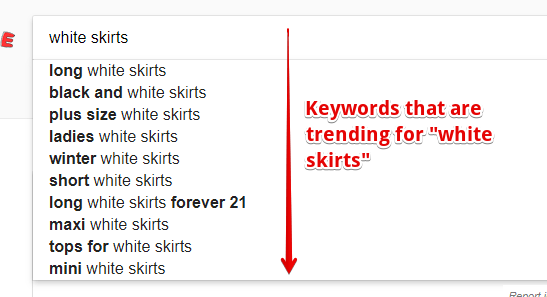
Thanks to Google’s technology, these keywords can be found through the search bar. When you keep adding words into the space, Google will roll out some related terms and this reflects what people are actually searching online. See the example below.
Alternatively, you could also go into big e-retailers site to see what type of keywords they use for their products. Here at Zappos for example, we can see that several keywords are being used to describe a blouse product.
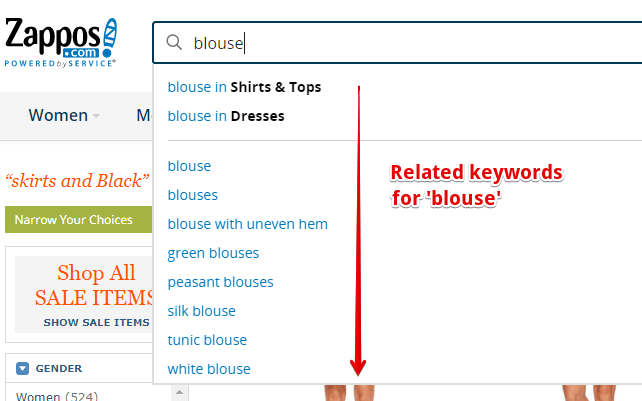
And if you go into each product page, you’ll find more elaborated keywords (usually 3,4 words or more) on the permalink, the title as well as the description. All these wording details actually serve a functional purpose – enabling search engines to index and rank your online store AND presenting the right item for a particular audience.
Another way to discover keywords that are trending or has a high number of searches in your niche is to use Google Keyword Planner. It’s a free keyword tool that allows you to analyze the popularity of a keyword in a particular country that is covered within your business shipping zone.
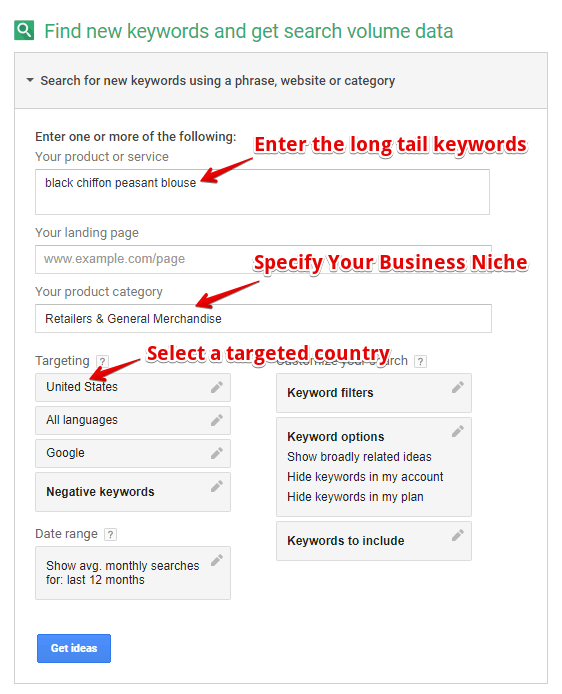
For instance, if you only deliver products to the United States, then it’s wise to target this country when researching for related merchandise keywords.
Now that you have a rough idea what keywords are all about, let’s see how to configure the Storefront theme using the various plugins that we’ve installed earlier to make your online store more search-engine and user-friendly.
Mapping Out The Important Pages
The quality of a website is largely determined by its page structure as it affects customers trust and convenience in online shopping. So the next step after keyword research is to map out the important pages that you’ll be using to build an online store.
To do this, simply go Pages ⇒ Add New to create the pages. In general, you’ll need;
- A Homepage – a summary of what you do for a business, what type of products/services is being offered and how they can benefit the customers.
- About page – an overview of the business establishment and your expertise.
- Contact – a dedicated page to allow customers to ask specific questions.
- Shop – navigates to your online store.
- Cart Page – allow customers to view selected items before purchase.
- Checkout Page – the payment transaction area.
- Blog – a dedicated area to post articles regarding your business activities.
- FAQs – a list of questions and answers that are commonly asked in regards to a particular topic.
- Privacy policy – a statement that discloses all of the ways the business gathers, uses, discloses, and manages customer personal information.
- Terms and conditions – a set of regulations which customers must agree to follow in order to use a product or service.
Now let’s see how we can put these pages together so that they make sense when someone lands on your business website.
Homepage Settings
The homepage is the first page that the users see when they land on your website via the custom domain. It is what grabs people’s attention, make a good impression and invite them to explore more about your products. Hence, there’s a lot to be done on this page before it goes live.
1) Upload Your Logo
The first thing to do here is to upload your business logo image according to the dimension that we’ve mentioned earlier. You can do so by going to Appearance ⇒ Customize ⇒ Site Identity where you’ll find a section for the logo placement.
The other part that you should also do is to create a site icon (aka favicon) resembling your logo, which will appear on the browser tab when people check on your website. A favicon is usually square in shape with the dimension of 512 x 512 pixels.
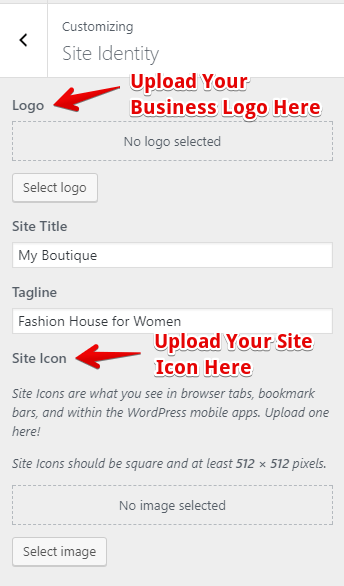
There’s also another section where you can insert the site title and a tagline, but this will override the business logo image so you can only choose either one. My recommendation is to use a graphic image because that will create a stronger branding impression.
2) Optimize the Homepage
First, you need to select a page to optimize as the homepage. At the customization area, select the page that you’ve created as homepage and set it to static display.
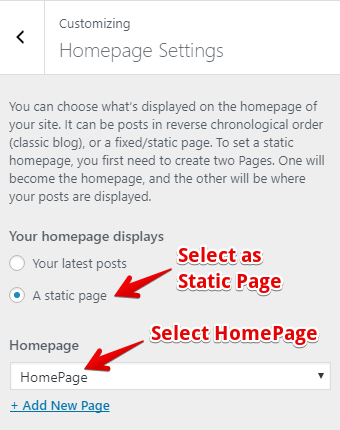
The process of optimization means to prime a particular page with important keywords (remember our keyword research earlier?) so that Google and the users will know what your site is all about. To do this, go to All In One SEO ⇒ General Settings ⇒ Custom Post Type Settings.
In the settings, make sure you enabled SEO for posts, pages, and products.
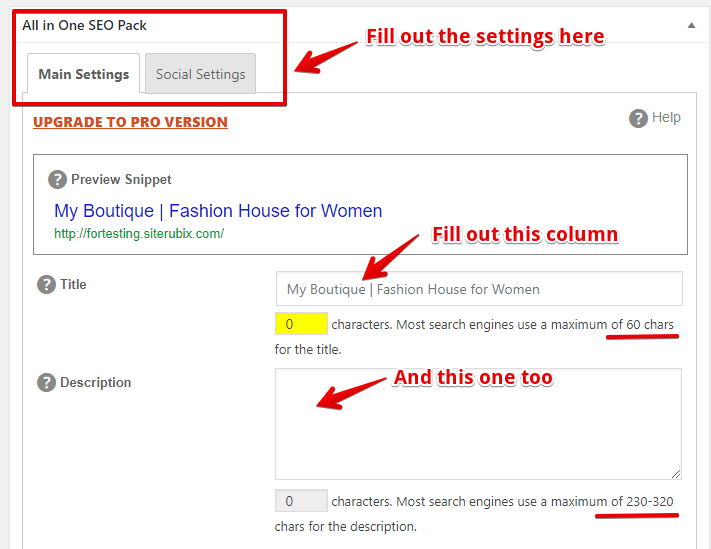 In doing so, you’ll be able to craft the Page Title and Page Description for each page through the main and social settings, using keywords. Fill out those spaces and be sure to take full advantage of the characters allocated for each of the columns; Page Title gets 60 maximum and Page Description gets up to 320 maximum.
Another important optimization here is to use keywords in the page title in H1 format. Fortunately for us, WordPress generates H1 for page title by default during the editing process so there’s nothing much to worry about here.
3) Menu Settings
Since the Homepage is the primary page that most people visit, it makes sense to have the menu links visible above and below the website so that people know where to navigate. The Storefront theme comes with a primary, secondary and handheld menu (for mobile version) that show on the top of the page.
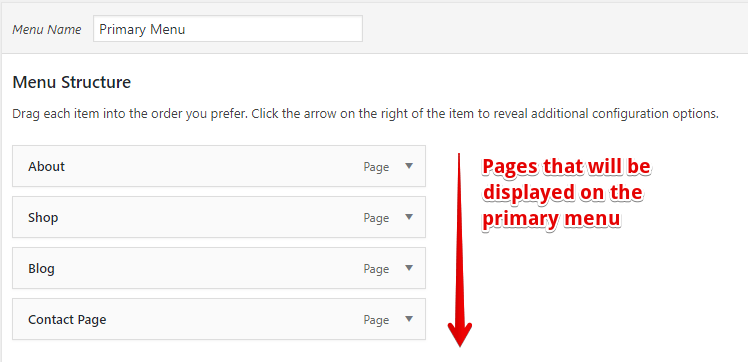
For simplicity, I am just going to configure the primary menu as the secondary menu will not show up on mobile. To do so, go to Appearance ⇒ Menus and create a menu called Primary Menu. Under this, add the relevant pages that you want to display. I would mostly go with the About Page, Shop, Blog and Contact Page.
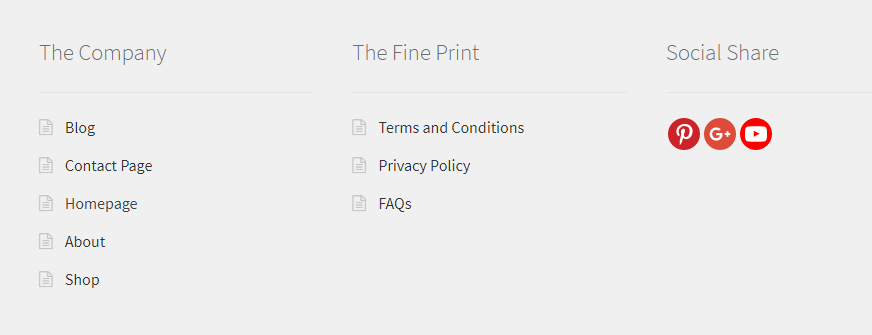
As for the bottom of the page, or what we called as the footer, there are up to four columns that can be configured and I am going to show you how to do so in three of them. At Appearance, go to Widget and you’ll find the footer settings. In this example, I’ve set Column 1 to display exactly as the primary menu, Column 2 for the fine print (FAQs, Privacy Policy, Terms, and Conditions) and Column 3 for social following.
The end result will look something like this.
Product Category Settings
E-commerce is all about constructing a relevant site hierarchy. From the homepage, you want to lead people to the product organization so the next thing to set up is the product category. Each business has its own categories that may differ from others.
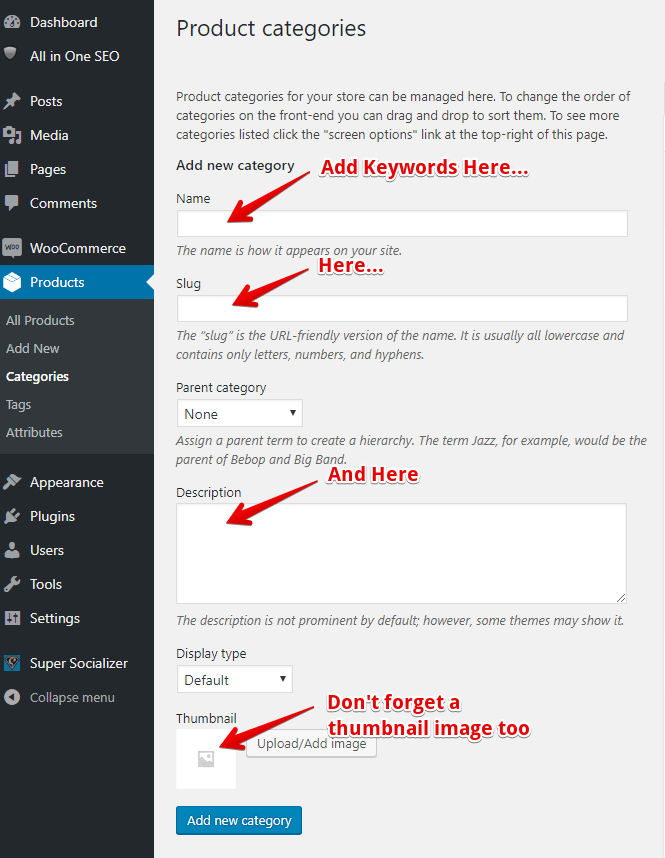
If you run a boutique store, a typical set of categories would be Women’s Tops, Shoes, and Accessories. If you sell tea online, they may be Iced Teas, Teaware of Blends so on so forth. To create a new category, go to Product ⇒ Categories and Add New.
What is important here is that the targeted keywords must be included in the Title, Slug, and Description. Of course, it would also help to boost the presence of each category with a high-quality thumbnail image.
A shop page is typically connected to the product categories. In order to allow for this navigation, go to ‘Product Catalog’ under the WooCommerce customization and under ‘Shop Page Display’, select ‘Categories’. And then, under ‘Category Display’, select ‘Products’. This will give your online store some kind of site hierarchy that is important for SEO.
Product Page Settings
Now we have arrived at our destination page which is the product page. If the previous settings were done right, users should be able to find these pages with ease.
Optimizing a product page is very similar to what we have done before this – making sure that the targeted keywords are in the SEO title, description as well as in the Product Short Description area. In regards to the latter, avoid using the exact description from the manufacturer as this may lead to content duplication in case the product is supplied to multiple sellers.
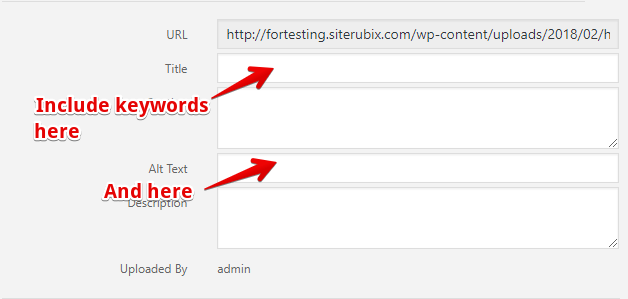
On this page, however, you want to include as many images and whenever possible, videos to feature a particular product so that it would look appealing to the users. In the image settings, make sure to also include the targeted keywords in the Alt Text for SEO purposes.
What I like about the Storefront theme is that it comes with a product review section which is extremely helpful for boosting a product’s value. So make sure to take advantage of this feature and invite verified customers to leave their ratings and comments after making a purchase.
Check Out Process Settings
An online store will not be complete without a checkout page so, in order to execute these two functions, we’ll need to insert specific shortcodes in the text (not visual) editor of each page.
- [woocommerce_cart] – shows the cart page
- [woocommerce_checkout] – shows the checkout page
After that, make sure to go to Woocommerce Settings ⇒ Check out ⇒ Checkout Pages and select the pages that match the specific functions. When that’s done, the cart or checkout page will display all the necessary columns for customers to complete their payment details.
Blog Settings
Do you know that blogging can also drive traffic to an online store? By using targeted keywords to publish articles related to your business niche, you can share your expertise, feature a promotion or show people your product benefits.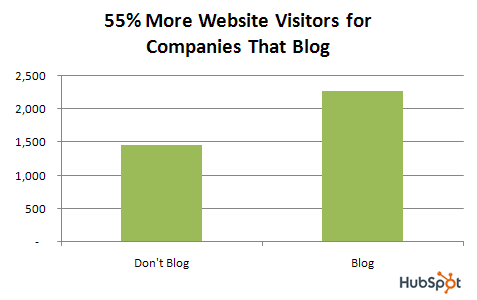
Optimizing a blog post is pretty similar to the steps we do for pages and here’s a quick reference checklist.
- Make sure you have keywords in Title, Description and Alt Text in the first image.
- Add relevant images and videos to make the article interesting to read.
- Link the blog to various relevant pages/posts within your website.
- Enable commenting on the blog so that people can participate in the discussion and opinion sharing.
- Share new articles every time they are published on the social network that your business is most active in.
Unlike pages, blogging keeps your website active and updated in the eyes of the search engines. The content will also rank your business for various search queries out there, so the more often you blog, the more targeted audience you’ll get.
How Much Is The Set Up Cost
Technically, the setup cost will include a domain name AND a WordPress hosting service which is usually renewed on a yearly basis. If you use an all-inclusive platform like the SiteRubix hosting, the average cost is only about $1/day, which I think is pretty decent for running a small to medium-size online store business.
So, What Products Do You Want to Sell Online
If you have some interesting products in mind, learning how to create an online store with WordPress will definitely help you to sell to more customers. The solution is pretty affordable and practical when you consider the number of people who are actively searching to buy stuff online these days.
Customizing WooCommerce isn’t as straightforward as other eCommerce programs, but as I’ve shown you, it’s definitely doable even for someone who has very little experience. I know I may not have covered the entirety of the setup details (otherwise this post will be way too long), so if there’s something you wish to know, please drop me a message in the comment area below and I’ll do my best to answer.
Meanwhile, do check out my recommended training platform for WordPress based online businesses and connect with like-minded people who are motivated entrepreneurs just like you.
If you’ve found this tutorial to be helpful, remember to share it with your friends. Thanks!

Great post Cathy!
I’ve always wanted to have a full fledged eCommerce website, I have this wide array of handmade phone covers that I promote on Instagram and somehow, more and more people started buying and orders started piling up.
One question though – there’s this section that I’m filling in that asked if I wanted to pay taxes. Is it compulsory to charge taxes though? A bit blurry on this one.
Hi Riaz, if you are selling online and you do not have a physical presence for this business, you don’t need to charge for sales tax. If you have a physical presence such as a store, office or warehouse, then you are required to fill out the information according to the law of the state that you are in.
This post is very informative. I have a site that is a store, but have not been able to utilize it because I had it built and never had hands-on experience with eCommerce. I could certainly use some of the advise given here and maybe revive my online business. Thanks so much.
Well Thomas, I am glad you benefited from this tutorial guide 🙂
This is exactly what I was searching for! I am in the very final stages of my own physical product launch and, to be quite frank, not all that impressed with the much more popular Shopify system that is available. I am looking into WooCommerce as an alternative, mostly due to its WordPress integration and ability to manage distribution channels – my area of expertise 🙂
Thanks for this tutorial, really helpful and ought to aid me in setting up my store without the need of outsourcing to some techie person.
Hey Derek, I am so glad that you benefited from this. Let me know when the online store is open for business!
Thank you so much for this article! I’m in the process of setting up my eCommerce site through WordPress and Woocommerce, and you had a few pointers that I hadn’t even thought about. I do have a question about a specific type of eCommerce platform – my store carries handmade items and patterns.
Do you have any ideas about additional plugins that may help out with one-of-a-kind items? Thanks.
Hi Lizzie, this must be very exciting for you. The plugins that you may want to consider for selling your handmade online are Catablog and WordPress NextGEN gallery. I’ve read good reviews about them. Hope this helps.
Well it was very timely to find your article since I just switched my theme so that I could add a WooCommerce component. Right now, I am rewriting content so that it shows better on my new theme, but within a week I had planned to go through exactly the process you so clearly outlined. The Google Keyword Planner plugin is completely new to me and I am excited to explore it. You also include reference to the Super Socializer plugin and I wonder if you can say a bit more about how you integrate it?
Hi Doug, the Google Keyword Planner is not a plugin. It’s a subset of Google tools that you can use for free. It’s more geared towards paid traffic keywords, but it has some good use for finding out geographical keywords, especially for retail based eCommerce.
As for Super Socializer, it’s a free social plugin that allows following AND sharing. The ‘following’ settings can usually be found on the widget section after installation. As for ‘sharing’, you can set what to be shown at the bottom of the page of your post editor.
Hope this helps.