In the span of two years in blogging, I’ve experimented with numerous social sharing features, some of which is complicated and some I really like but have to pay to use. After hunting for so long, I’ve finally found one that suits my blog. The tool that I am referring to is called AddThis and if you haven’t heard of it before, this AddThis.com review will show you how to integrate a professional social sharing feature without costing you a bomb.
What Is AddThis?
AddThis is a software that provides tools for online marketers to improve their website through social sharing, engagement and conversion.
Since launching the service in 2006, the tool has served more than 15 million domains, helping individual bloggers and big corporations grow their business. It’s easily integrated with any website platforms such as WordPress, Blogger and Shopify.
How Does It Work?
There are 3 types of features that you can use out of this software;
- Social Sharing and Following
- Audience Targeting
- Content Recommendation
In the following tutorial, I am going to show you how each of them work.
1) Social Sharing
With this feature, you can select different types of social sharing buttons and even make them responsive. I’ve always wanted something more visible than the current one that I am using and I am glad that AddThis offers the sharing sidebar.
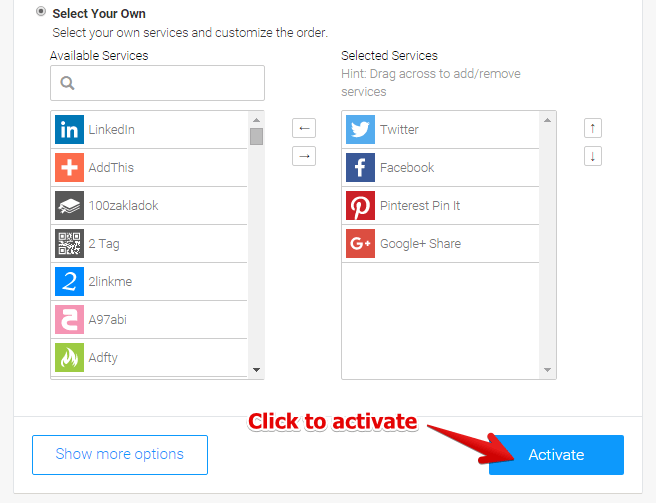
First, you have to choose the template and set up according to your needs. Within the settings, you can opt for the sidebar to appear on the left or the right and select the social networks that you want to appear on the website.

Next, click to activate and a set of codes will be auto-generated for you to embed in the HTML of your website. If you are using WordPress, this can be found at Appearance > Editor > footer.php. You want to look for the code that says </body> and embed the entire auto-generated code before that (as shown in the example below).

Then, go back to the front end of your website and you will be able to see the sharing buttons on the sidebar. If you prefer not to deal with codes, you can also install the feature with a WordPress plugin as shown in this video.
2) Follow Buttons
For the follow buttons, you can choose to have it horizontal, vertical or even customize the designs. After setting up your social profile links to each button, you just need to activate and grab the new auto-generated code and embed in your website, just like the previous step.
Here’s an example of my new social follow buttons.

What I like about both the social sharing and the follow buttons is that the feature ‘sticks’ with the direction of the readers. Which means, whenever the readers scroll down or up the website, these buttons follow along as well, acting like a gentle reminder for people to take action.
3) Targeting
The targeting tool is a great feature to promote a link, collect emails or enhance your social sharing. You can target an audience based on where they are coming from or what device they are using. The call-to-action can be positioned at any part of the website which you think can attract the reader’s attention.
For example, I used this feature to promote my main product review and I’ve created a link to lead readers to that particular page. After tweaking the settings, I just need to save, activate and again, embed the code for the call-to-action to appear on my website.
4) Recommended Content
In this feature, AddThis will automatically display some of your blog posts based on the relevancy of the content. You can control the layout, how many content to recommend and even set a specific URL for better targeting effect.
The installation process for this feature is exactly the same as the others.
How Much Does It Cost?
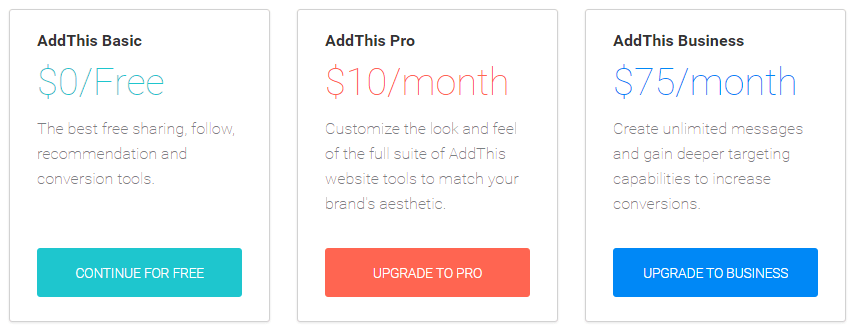
AddThis comes with 3 types of pricing plan; Free, Pro and Business

All the steps that I’ve showed you came from a free account and if you are just starting out, those basic features are more than enough to get your website going. If you want more customization and priority support, then the paid plans are worth considering.
So, Is Add This Worthy of Your Time?
Honestly, I am surprised that I didn’t discover this smart tool much earlier. After using it for a while, I find that it’s totally worthy of my time because;
- I was able to avoid adding 3 additional plugins for different social functions on my blog (an advantage when you learn how to use codes instead of plugins)
- Installing the codes is very easy and it only took me a few minutes.
- Now, my site looks sleeker and readers can easily see what I want them to do.
So, if you think your site could use more reader’s engagement, this is a tool that you can certainly try at no cost. As with everything else on the web, remember to backup a copy for your site before you add any new feature.
I hope this AddThis.com review has given you something interesting to think about for your own social sharing. If you have any thoughts or questions about this topic, feel free to leave a comment below and I’ll get back to you.

Thanks for the detailed review Cathy. Forwarding this post to my developers.
Currently we are using Open Social Share by Social9 for our clientele’s WordPress, Drupal and HTML Sites.
Hi cathy,
Excellent site and article. Thanks for sharing it. I have been looking for a quality social sharing tool. You mention this can avoid the use of plugins and some kind of code is required. Does that code cause any software conflicts with Aweber or slow down your site?
I am asking as I am sure you are aware site loading is an important aspect of site speed and user experience.
I’ve not experienced any technical issues so far after installing AddThis via the coding method. At the moment, I only have 4 activated plugins. According to Pingdom, my website speed test score is 93 with a 2 seconds loading time. Guess that’s not too bad.
I’m reading this tutorial at a very important time and found it quite helpful. Just learning about the importance of social media, AddThis appears to be the easiest way to go. I’m going to bookmark this tutorial and when ready, will refer to it again. How do I transfer my blogs to G+ and facebook?
Hi Karen,
Do you mean how you share your blogs on Google Plus and Facebook? After installing AddThis, you need to make sure that you’ve set up your SEO plugin and optimize it for social sharing. This will capture a small snippet of your blog to share with the people on your network. Hope this helps.
Hi Cathy,
Thank you very much for this article. This is the exact plug in I was looking for, In fact, just today I was thinking to myself that I would really like to have one of those bars with the various social sharing buttons because I think it will do a lot to help spread my blog.
I really didn’t know how to do it and I wasn’t sure where I should start. But it s a good thing that I ran across your article so now I know I will be able to do it.
Thanks!
Hey Alec, I am glad to know that this article was helpful 🙂
Sounds like a great tool. I’ve always been a little wary of trying anything that involves the word “coding”, but this looks like it could be a great tool. I currently use Sumome. Have you hear of/used it? How do you think it compares to AddThis? Thanks for that detailed review. It might be one of those tools I have to put on a list of things to try.
Yes, I’ve used SumoMe before, but I find that the customization involves a bit more steps than AddThis. I know they are popular for a lot of features, but some people tend to overdo with their websites and I find that too cluttering. AddThis is cleaner and I feel that it suits the presentation of my blog better.