
There are various technologies available nowadays to help us sell online and if you are into things like eBooks, photography and videos, you may earn a substantial profit using the WordPress platform. Hence, in today’s tutorial article, I’ll be showing you how to use Easy Digital Downloads (or EDD for short), what to set up and eventually, how to drive traffic to your site.
This is going to be an interesting one, so make sure you read until the end.
What Do You Need Before Hand
First thing first, you will need a self-hosted WordPress website, preferably one that comes with an SSL certificate service. This is because you’ll be accepting online payments and it’s important to keep this transaction details protected for the benefit of your business entity and the customers.
Setting up the certificate can be a tedious task and that’s why I prefer to use hosting companies that provide a single click installation. It takes away all the technical details and allow me to get things done faster.

Once that’s done, make sure you have a merchant account and it’s always a good idea to create one from PayPal since it’s one of the most common online payment gateways. Another advantage of using PayPal is that you can create a sandbox account to make test payments WITHOUT having to involve actual cash transaction. The video below will show you exactly how to set it up.
Meanwhile, you’ll need to convert the digital products into specific files before uploading to the hosting server. There are many formats available and each differ according to the type of products that you are planning to sell.
- eBook – PDF, MOBI, ePUB, AZW, LIT and ODF
- Photos – JPG, PNG, PSD, TIFF and GIF
- Audio – MP3, AAC, PCM, WAV and AIFF
- Video – AVI, FLV, WMV, MOV and MP4
Lastly, to ensure that the EDD plugin can function properly, you want to select a WordPress theme that’s ideal for digital eCommerce marketing. There is a variety of free and paid themes to choose from, but before paying anything for premium, I would recommend testing out some free themes first as this will give you a good feel in terms of technical compatibility and aesthetic features. When you have more experience, then we can talk about going professional with premium themes.
EDD offers 5 free themes that you can download from their official website. Alternatively, you may also find some from the WordPress repository by entering keyphrases like ‘digital product’ (or any other relevant keywords) in the search filter. This will return a number of themes which you can then choose based on their ratings and usability.
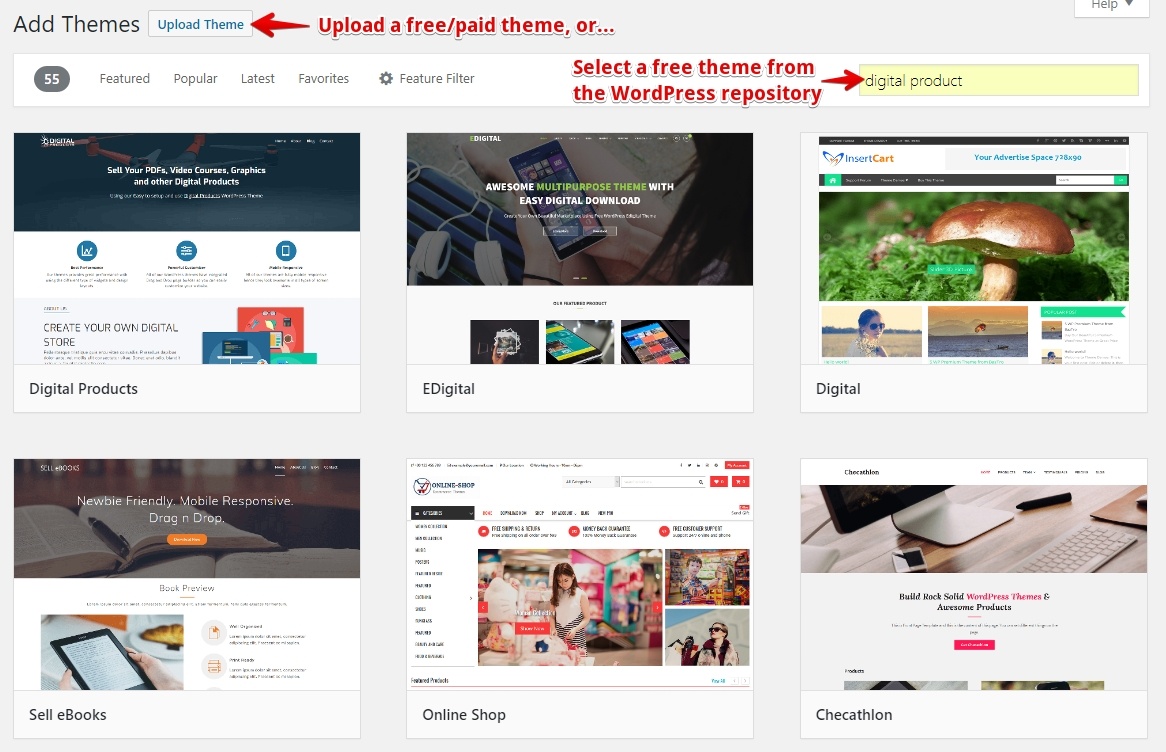
For convenience, I’ll be installing one of the free themes from WordPress so that we can quickly proceed to setting things up.
Basic EDD Settings
Before we get into the technical details, let me walk through the online purchasing flow in layman’s term so you’ll know what to expect.
When customers visit your site, they will find the product in your store, click to add into the cart and pay during checkout. After the purchase is made, they will be directed to an invoice page where a link will be made available for them to download the product immediately.
In the short span of a few clicks, there is actually a heap of details running behind the scene to process the transaction and ultimately, allowing the download to take place. Hence, pay close attention to the settings that I’ll be walking you through to ensure that everything runs smoothly.
Are you ready? Here we go.
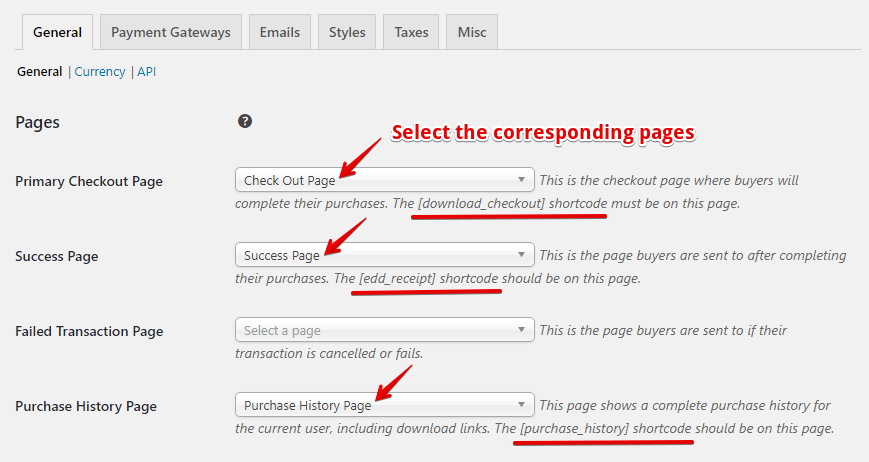
1 – Page Settings
After installing the EDD plugin, go over to the Page settings under the General tab. There are 4 important pages to set up here;
- Primary Checkout – Page for customers to complete their purchase.
- Success – Page displaying the transaction receipt.
- Failed Transaction – Page where customers are sent to if their transaction is cancelled or fails.
- Purchase History – Page that shows the history of purchase and download links.
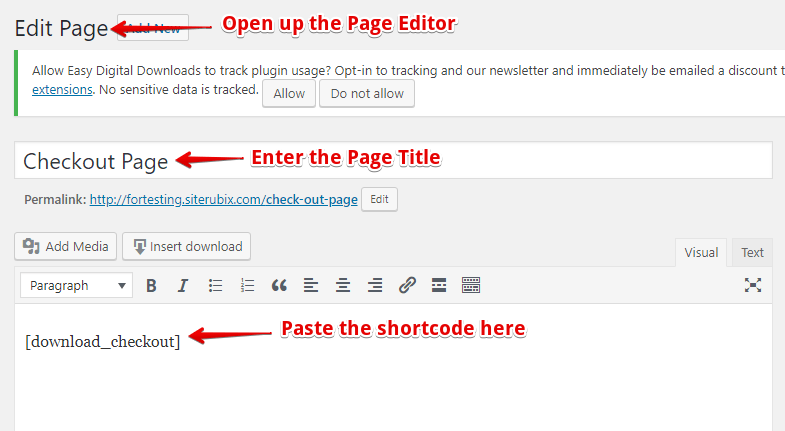
For each page, there’s a shortcode that you can copy and paste to automatically generate that particular content. For example, the shortcode for Primary Checkout is [download_checkout] and so forth. You can find these shortcodes displayed next to each correlating column.
Over at the page editor, create 4 pages for each title and paste the shortcodes as shown above. After that, make sure to select them in the settings to activate their functions.
2 – Store and Currency Settings
This one is pretty straightforward. You just need to select the country/province and currency for the store.
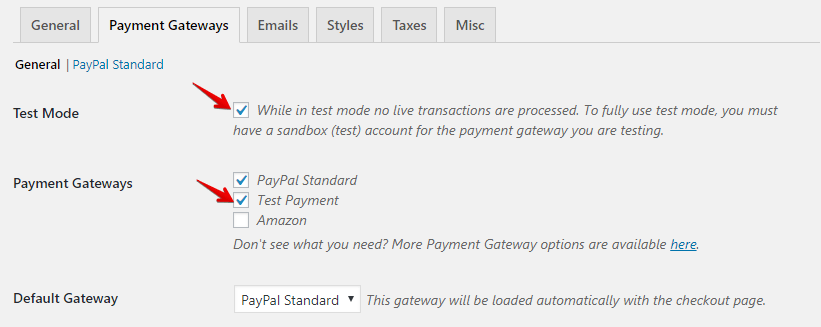
3 – Payment Gateway Settings
Remember the sandbox account that we created earlier? Under this setting, remember to check on Test Mode and Test Payment. A sandbox facilitator (merchant) email can be used for this purpose. When your site goes live, however, remember to uncheck the Test Mode and replace the PayPal email with your actual account.
4 – Email Settings – to send receipts and links
In this section, we are basically setting up a receipt email template for your customers. It should contain your website’s email (not your personal email) address, a business website logo and a receipt text to acknowledge the purchase and guide your customers on where to download their files.
5 – Taxes Settings
This section isn’t mandatory. Some countries/states don’t impose tax on digital purchases so it really depends on which location you are selling from.
6 – Miscellaneous Settings
Under this section, check “Enforce SSL on Checkout” as this will provide some level of trust when customers purchase something from your site – granted that you already have SSL activated on your site. You may also want to spend some time planning the Terms of Agreement in regards to copyrighting or in cases of refunds.
Now that we’ve completed the basic settings, let’s see how you can list the product in your digital store.
How to Add a Download File
A digital product is typically known as a download so for each product, you’ll be creating an individual download page that has the product title, information and pricing. By now, you should have your digital files converted and ready for uploading.
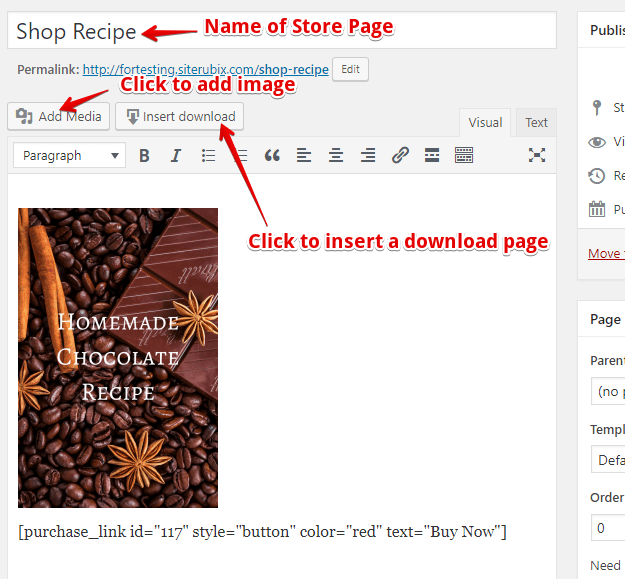
There’s also an auto-generated shortcode that you can use in blog posts to direct people to purchase so that feature will come in handy during content marketing later on. In order to make the product look attractive, you should add a download image. It acts as the front cover of the product and you can easily create one using Canva if you don’t have any experience in designing.
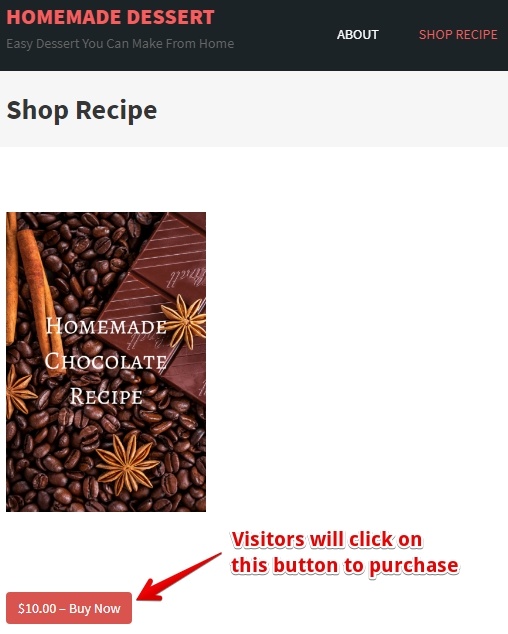
Next, create a shop/store page and insert the download page so that it gets listed. The front cover image, however, has to be added separately through the ‘Add Media’ tab.
At the front end, this is how your digital product will look like to the viewers.
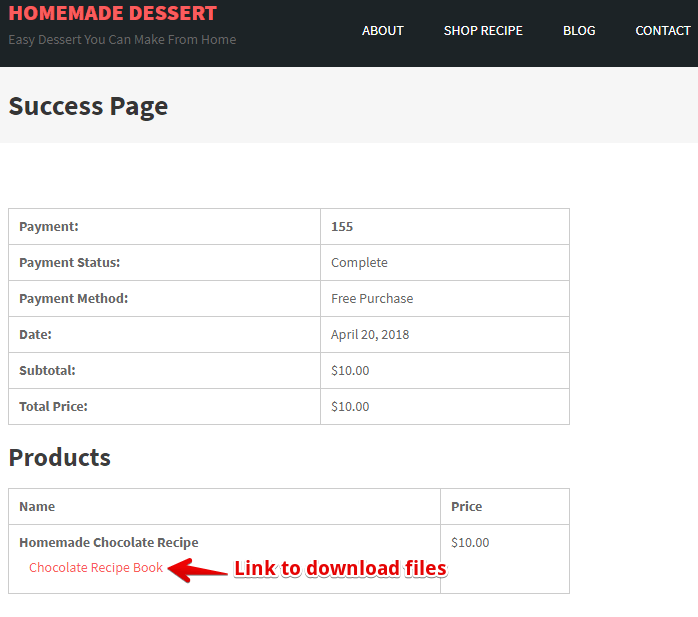
They will then be directed to the ‘Checkout Page’ to key in their name and email address (*NOTE – Here’s where you can use the sandbox buyer’s account for testing), make their purchase and directed to the ‘Success Page’ where they will see the invoice and a link to download the digital product.
In a nutshell, that’s how you configure the settings on EDD plugin and process a sales transaction on your digital eCommerce site.
How to Get Traffic to Your Site
Now, for an even bigger question – how do you get customers for your product?
Uploading the file is one thing, getting it to sell is a different matter altogether. For most beginners, your product is going to look very new in the market and without a large dose of customer reviews, it’s going to be challenging.
One of the best ways to promote your product for free is to blog frequently around topics that are trending within your niche. After all, WordPress has a winning edge when it comes to SEO so as long as you are creating content that people want to read, you are going to build traffic gradually to your site.
But it isn’t just volume that we are going after. The content also has to be targeted and relevant to your promotion. Fortunately, niche-related topics aren’t difficult to find and with a little help from Google and a powerful tool like Jaaxy, you can discover many potential keywords in a short amount of time.
For newbies, I highly encourage to start with low-competition keywords first as they are easier to rank for and get the attention from viewers. This can lead to more people checking out your product and ultimately, increasing your sales conversion. When you have more experience with organic keyword research, it will be more worth your time and money doing paid traffic.
What Is Your Digital Product Inspiration
This article is barely scratching the surface of selling digital products online, but I hope that by showing you how to use Easy Digital Downloads on WordPress, you’ll be inspired to start an online business and truly take advantage of your existing skill set.
If you have any questions/comments in regards to this tutorial, please leave them in the comment section below. It will be great to get some discussion going.
You may also be interested in;

Thanks for the quick tutorial on the Easy Digital Downloads plugin. I am actually interested to sell a newly created digital product, but did not realize how easy it was to install. I was just wondering if the plugin would slowed down a site speed? Also, are there any ‘bugs’ issues within the system?
Hi Glenys, I think the best resource to answer your questions would be to visit their plugin database here. There’s a bunch of talented people that work around the clock to keep the plugin going so you should be able to find some helpful information there.
Hey, this is an interesting article and I enjoyed it. I have started writing eBooks myself and do have one for sale on Amazon. I did not know how to do all of that stuff – it kinda looks complicated, but cool at the same time. There is still a lot to learn, but I need to get more traffic in order to sell more digital products online.
This is perfect for people who are going to the next level in the game. Most people feel that they are happy with affiliate sales and some not.
With affiliate sales, you will get a percentage of the sales but when you create your own product you will cash the whole money for yourself. Having some of your product can give you some authority among your competitors.
I think this is also a transaction phase where people are trying out e-commerce, before going all out to open a Shopify store for example.
Yup, creating and selling your own digital product is really a level up and can certainly be more profitable when you’ve become an expert in the niche.
I like how you have simplified the process of setting up a digital platform. I have a PayPal account that I get money paid into, but I have never heard of the sandbox feature before. So thanks for that nugget of info.
How would you go about setting up a PayPal merchant account like you mentioned?
Hi Kevin, when you go to the PayPal create account page, you should be able to find two options, whether it’s for personal or business. If you choose the latter, that will guide you through the process of setting up the merchant account.
If you already have a personal account, the merchant tab should be easily located somewhere on your dashboard. Hope this helps.